You can then open up sdl_handmadehero.cpp, set breakpoints and generally have fun debugging.
<-- Chapter 0 | Back to Index | Chapter 2 -->
Because I wouldn't wish coding X11 on anyone, we're going to use (version 2 of) the Simple Directmedia Layer which is practically a system library on Linux anyway. You can install this with
apt-get install libsdl2-dev libsdl2-dbgThis installs the SDL2 development and debug packages. You'll then be able to use SDL2 from within your programs.
Let's create a directory for our project:
mkdir handmade
cd handmade
mkdir code
cd code
Now, let's make a new file to put our game in. You can use whatever editor you like (I'll use vim but you can swap vim with emacs or your favourite editor anywhere and everything will still work.
vim sdl_handmade.cpp
In this file, we're only going to insert the entry point. On windows, this was WinMain, but everywhere else it's main(). Let's put a basic main() function that doesn't do anything in.
int main(int argc, char *argv[])
{
	return(0);
}
We now want to compile this! In windows we used a .bat file. Here we'll use the equivalent on Linux, a bash script. So, let's (in the same directory) make a new file called build.sh. We start with a line:
#!/bin/bashThis tells Linux that /bin/bash is the interpreter that understands the language we're using. As bash is the shell that normally runs your command line, if we use it as the interpreter we get the same behaviour in our script. Neat!
So now we need to work out how to use the compiler. In windows you need to set up the path, but in Linux, the compiler is usually already available. Let's see what happens if we run it:
$ c++
c++: fatal error: no input files
compilation terminated.
That doesn't seem brilliantly useful, but it lets us know that the compiler is working, and just waiting for us to give us some input. Let's see what version of the compiler we have:
david@sparky:~$ c++ -v
Using built-in specs.
COLLECT_GCC=c++
COLLECT_LTO_WRAPPER=/usr/lib/gcc/x86_64-linux-gnu/4.9/lto-wrapper
Target: x86_64-linux-gnu
Configured with: ../src/configure -v --with-pkgversion='Ubuntu 4.9.1-16ubuntu6' --with-bugurl=file:///usr/share/doc/gcc-4.9/README.Bugs --enable-languages=c,c++,java,go,d,fortran,objc,obj-c++ --prefix=/usr --program-suffix=-4.9 --enable-shared --enable-linker-build-id --libexecdir=/usr/lib --without-included-gettext --enable-threads=posix --with-gxx-include-dir=/usr/include/c++/4.9 --libdir=/usr/lib --enable-nls --with-sysroot=/ --enable-clocale=gnu --enable-libstdcxx-debug --enable-libstdcxx-time=yes --enable-gnu-unique-object --disable-vtable-verify --enable-plugin --with-system-zlib --disable-browser-plugin --enable-java-awt=gtk --enable-gtk-cairo --with-java-home=/usr/lib/jvm/java-1.5.0-gcj-4.9-amd64/jre --enable-java-home --with-jvm-root-dir=/usr/lib/jvm/java-1.5.0-gcj-4.9-amd64 --with-jvm-jar-dir=/usr/lib/jvm-exports/java-1.5.0-gcj-4.9-amd64 --with-arch-directory=amd64 --with-ecj-jar=/usr/share/java/eclipse-ecj.jar --enable-objc-gc --enable-multiarch --disable-werror --with-arch-32=i686 --with-abi=m64 --with-multilib-list=m32,m64,mx32 --enable-multilib --with-tune=generic --enable-checking=release --build=x86_64-linux-gnu --host=x86_64-linux-gnu --target=x86_64-linux-gnu
Thread model: posix
gcc version 4.9.1 (Ubuntu 4.9.1-16ubuntu6)
Wow: that's a lot of stuff we didn't want to know. It does, however, tell us one very useful thing. Have a closer look at this line:
Target: x86_64-linux-gnuThis tells us that we're compiling for a 64-bit x86 CPU running the Linux kernel and GNU standard libraries.
| You can compile for 32-bit systems from a 64-bit Linux system, but it's a little more complicated. You need to install the g++-multilib package, and then use the -m32 option. This does make installing libraries quite nasty, though, so we'll be following with 64-bit. If you have a 32-bit system, I (and probably Casey too) will point out the differences when we come to them. |
So now let's compile our code! From our handmade directory, type:
c++ sdl_handmade.cppIf we then look in the direcory, we have a new file: a.out. By default, gcc outputs your program to a file called a.out.
With all of the files lying around, let's put our compiled code in a separate directory. Let's go back to build.sh and get it to do our compiling for us.
mkdir -p ../../build
pushd ../../build
c++ ../handmade/code/sdl_handmade.cpp
popd
We add the -p option to mkdir to stop it from complaining if the directory already exists. The last thing we need to do (after saving) before we can run this bash script is to mark it as executable.
chmod +x build.shWe can then run it with
./build.shWe have to put the ./ at the start to let Linux know that the script is in the current directory, as Linux doesn't have the current directory in the PATH by default. You can also run the script (even without marking it as executable) by using
bash build.shIf we now look in the ../../build directory, we can see our a.out file. Success!
Really though, a.out is not the greatest name for our binary, so let's change it. Open build.sh up, and add this to the end of the c++ line.
-o handmadeheroThis tells gcc that we want to output to the file handmadehero. If we re-run ./build.sh and look in the ../../build directory, we now have a handmadehero binary. Woo!
Let's cd into our ../../build directory and run our new program.
./handmadeheroYou'll see that it doesn't do anything. That's good: our program wasn't supposed to do anything, so it's working correctly!
Now let's get this thing working in the debugger. The first thing we need to do is to compile the game with debug options enabled. Unlike Visual Studio's compiler, gcc does not generate the needed debug info for the debugger to know what parts of the compiled code matches up with which parts of the compiled binary. To do this, we need to add the -g option to our c++ command line. The line in build.sh should now look like:
c++ ../handmade/code/sdl_handmade.cpp -o handmadehero -g
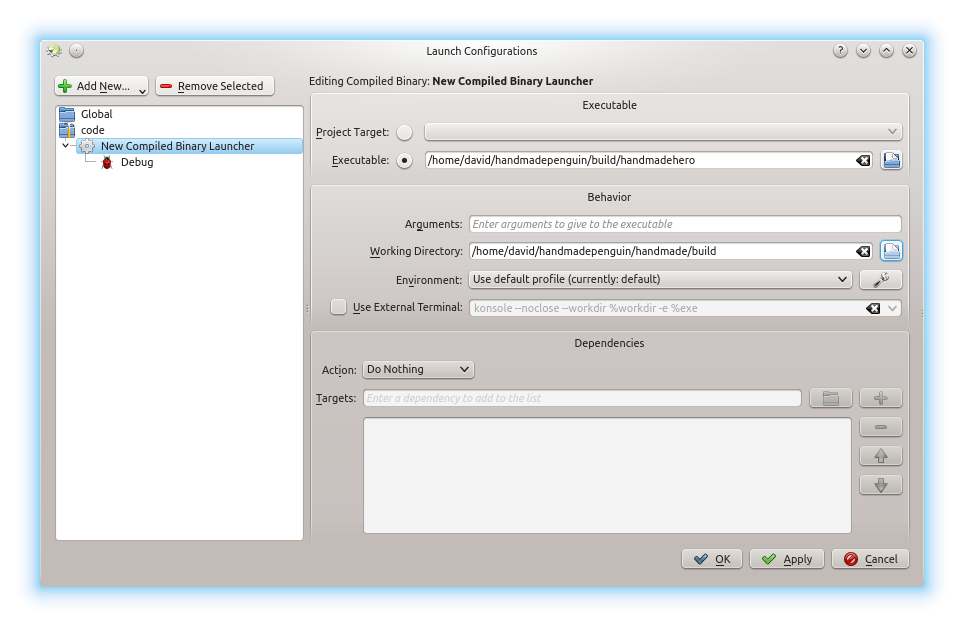
Now let's get our debugger working. If we're using KDevelop, we have a couple of nasty issues to work around, too. Let's start up KDevelop. We need to have a project for KDevelop to work, but there's no easy way to create one with our custom build system. The quickest way to get things working is to Open project, navigate to the directory with your build.sh in it and manually enter build.sh in the filename box and hit enter. Select Custom BuildSystem and hit Enter.
We then go to the Run menu and select Configure Launches. You can then Add New... Compiled Binary.
Enter in the path to your build/handmadehero as an executable, and create a data/ directory for the Working Directory.
You can then open up sdl_handmadehero.cpp, set breakpoints and generally have fun debugging.
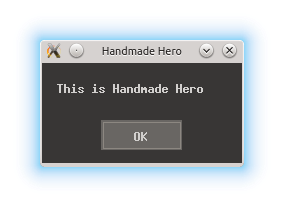
Let's add the message box from the end of the stream using the SDL library I mentioned at the beginning. Go into the main() function and add this line (before the return line):
SDL_ShowSimpleMessageBox(SDL_MESSAGEBOX_INFORMATION, "Handmade Hero", "This is Handmade Hero", 0);You can see the documentation for this at the SDL Wiki.
If we try to compile this, though, we get an error (or two).
../handmade/code/sdl_handmade.cpp: In function 'int main(int, char**)':
../handmade/code/sdl_handmade.cpp:3:27: error: 'SDL_MESSAGEBOX_INFORMATION' was not declared in this scope
  SDL_ShowSimpleMessageBox(SDL_MESSAGEBOX_INFORMATION, "Handmade Hero", "This is Handmade Hero", 0);
../handmade/code/sdl_handmade.cpp:3:98: error: 'SDL_ShowSimpleMessageBox' was not declared in this scope
  SDL_ShowSimpleMessageBox(SDL_MESSAGEBOX_INFORMATION, "Handmade Hero", "This is Handmade Hero", 0);
This is because we haven't yet included the SDL headers and library. We need to do two things to get it to work. First, we need to point the compiler to the directory where the include file is and to where the library is.
We need to go back to our c++ line and add this:
`sdl2-config --cflags --libs`There are a couple of interesting things here. First are the backticks (`). These let bash know that we want to run a program (sdl2-config) and include its results as part of the command. In this case the sdl2-config program returns the config options for setting up SDL. If we run sdl2-config directly, we get the following:
$ sdl2-config
Usage: /usr/bin/sdl2-config [--prefix[=DIR]] [--exec-prefix[=DIR]] [--version] [--cflags] [--libs] [--static-libs]
$ sdl2-config --cflags --libs
-I/usr/include/SDL2 -D_REENTRANT
-L/usr/lib/x86_64-linux-gnu -lSDL2
The --cflags tells sdl2-config to return the flags for the C/C++ compiler, and the --libs gives the linker options. We'll use both, as we're compiling and linking in one stage.
We then need to add
#include <SDL.h>to the start of the file. When we compile again, it will work!
And that's the end of Chapter 1. Questions can be directed to david@ingeniumdigital.com.
If you've bought Handmade Hero, the source for the Linux version can be downloaded here.